Shopping Cart Modules
We have shopping cart modules available so you can sell products or services on your website. The Shopping Cart system includes 2 modules...
1) The Shopping Cart module for products
2) The Shopping Cart gateway
In order to have your shopping cart operational on your LEAP site you'll require those two modules installed on different pages, you'll only need 1 Gateway but could require multiple Shopping Cart module(s), as long as they're pointed where your gateway is.
1) The Shopping Cart Module

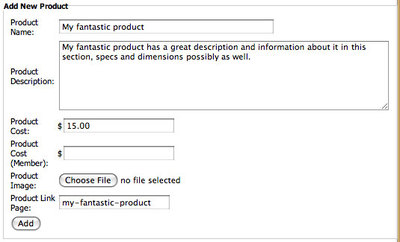
The shopping cart module is where you add the products/services in. Click "Add Product" to get the dialogue box where you can input your products information.
- is the name of your product, make sure to make it descriptive and unique.
- is a short description about your product possibly including some dimensions or specs, if you wish to write a whole piece about your product we'll get to that field a bit later.
- The cost of your product, be sure to include cents even if it's $50 it should be inputted as 50.00
- This is not a necessary field. If you have a membership database that provides members with a discount we can program this field to be active for you.
- A graphic of the product, could say "BROWSE" on some computers instead of "CHOOSE FILE". Click this button to bring up your harddrive and find the image of your product to upload. Note: please be aware you cannot resize your image with this particular upload function so make sure your image is the properly size before uploading.
- If you wish to link your shoppers to more information about the product put a name of a link in here (you can always create the page after this step). This is handy as the "Product Description" only holds a certain amount of characters.

Important: Click advanced before you navigate away and make sure the shopping cart page is enabled to point to the page with the Shopping Cart Gateway. If this step is not performed your shoppers will not be able to checkout!
Don't have a gateway page? Read onto step 2.
2) Shopping Cart Gateway Module
The shopping cart gateway should only be added to 1 page and once throughout your site. But the shopping cart gateway is the most important piece of the shopping cart system because it forwards your shoppers on to process payment for your products.
We suggest our customers create a page called "Checkout" and then add the shopping cart module to that page, but if you have a different reason this is not a requirement, you can name the page anything you like... As long as there is a page is the important piece.
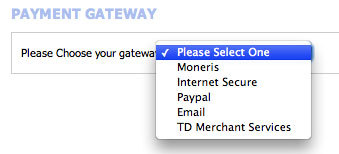
Once the page is created - place the Shopping Cart Gateway on your page and choose your 3 party payment processing company from the drop down list.

Each of the drop down selections has their own requirements so whomever you choose to process your payments will provide you or Treefrog information so we can pass the purchases over to them for the payment section.
NOTE: With our Shopping Cart system we do not perform any processing of payment on your website, we always recommend to sign up with one of the 3rd party payment processing companies above, they're all reputable and extremely secure.
The one option we do have in there if you haven't signed up with any of those services is...
You can choose email to have the orders emailed to you, but you'll have to organize how to process their payment after the email has been sent to you. Some of our customers prefer to call the customer and follow up with the payment over the phone, so we've included this option.
That's the shopping cart system!
Is the guide confusing?
Doesn't make sense?
You know all this and need more?
How does this apply to your site? Ask us your questions! and we can help.


